How to Process a Refund in Xero
In a perfect world, once you’ve made a sale (done a happy dance) and collected money from your customer - you’d keep the funds and your customer would live happily ever after.
Unfortunately, that’s not always the case. Nobody likes giving money back, but sometimes it needs to be done.

At least if you account for it properly, then you can decrease the taxes you owe in the future and have clean and organized books. Who doesn’t find joy in that, right?
So here is a quick breakdown of how to refund a customer for an original purchase made through two example payment processors - Square and Stripe - and how to properly account for this in Xero.
STEP 1: Process refund through your payment processor
Examples:
Square - go to your Transactions page and select the transaction to refund. In the top right corner, click “Issue Refund.”

Stripe - go to your Payments page and select the transaction to refund. In the top right corner, click “Refund.”

This will mark that payment as refunded in Square or Stripe.
STEP 2: Record the refund in Xero
1. In Xero, search the customer’s name you are refunding by clicking on the magnifying glass in the top right hand corner. Select their contact.
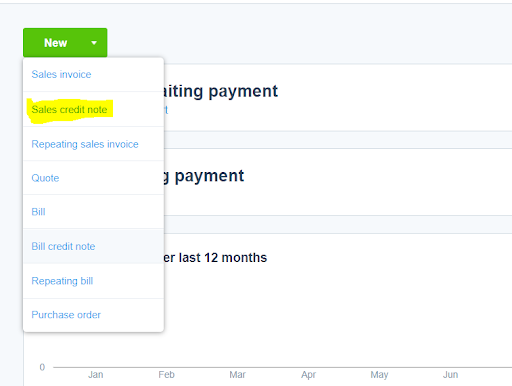
2. Under their contact, in the top left corner you’ll see the drop-down “New”. Under New, click on “sales credit note.”
3. On the credit note page, fill in the date that you processed the refund and input the same details from the original invoice. It is good practice to put the original invoice number in the “Reference” section and write a quick description on why it was refunded or what was being refunded in the “Description” section.

4. You can then either allocate the credit amount to future payments
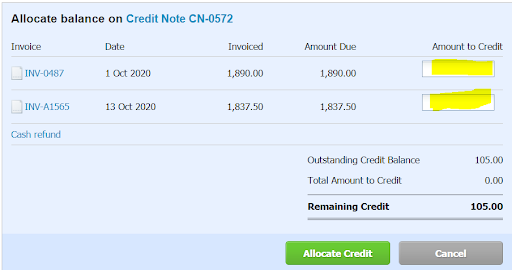
Or issue a “Cash Refund” and mark the Date it was refunded and what account it was paid from (could be a Stripe account or Square Clearing account, etc.). If you have refunded the customer in step 1, you’ll want to issue a cash refund.

5. Once the credit note is marked as paid, match the payment to the amount being spent in your Stripe feed or other bank account on the Reconciliations page.
You have now successfully refunded your customer. Hopefully you don’t need to make a habit of it, but in the event it happens again - you’ll be prepared!