How to Run an Off-cycle or Manual Pay in Wagepoint
So you’ve gotten the hang of running payroll in Wagepoint, but now you’ve got something that falls outside the norm - what to do?!
I will tell you!
Every now and then you’ll need to run a payroll that goes outside your regularly scheduled programming. This is referred to as an off-cycle payroll.
Reasons for this can be:
- Final pay for an employee - making sure they are getting their severance or final pay within 3 business days after letting them go.
- Bonus pay! - Sometimes it is better to run this as a standalone payment, but you can include it in regular payrolls as well
- Missed hours - A darned employee forgot to give you their hours before you had finalized payroll *shakes fist*
Prequel to Step 1
It takes 3 business days for Wagepoint to collect and disburse funds. This means that you’ll want to consider whether you need to turn off direct deposit and manually pay your staff (usually by e-transfer or cheque).
*You can run payroll and manually pay staff without the 3 business day delay.*
For the examples of a staff’s final pay and missed employee hours, you’ll typically want them to have their money sooner than later, and will choose to manually pay them.
So! Let’s start with turning off that usually convenient direct deposit setting in Wagepoint.
Step 1 - Company Account Settings
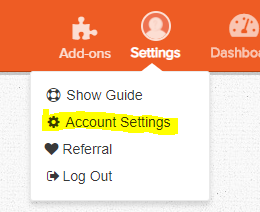
Navigate to your company account settings in Wagepoint by using the “Settings” dropdown menu and choosing “Account Settings.”
Step 2 - Turn Off "Employees Paid By Direct Deposit"
You should now be seeing a page of toggles where if you’re anything like me, no matter how many times you see it you can’t remember exactly where this particular toggle is:
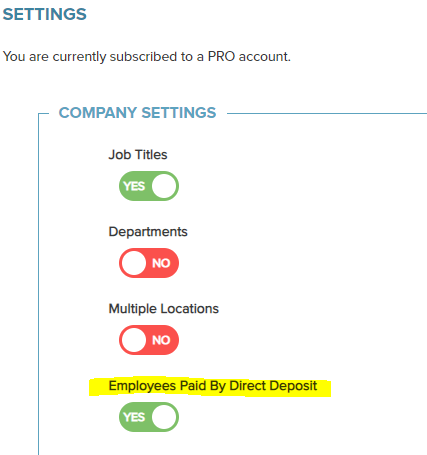
^^ that’s where it is.
You’ll want to toggle this option to “No”.
Here’s the tricky and very important part of this step - You need to save this change!
There is a save button waaaay at the bottom of the screen, and if you don’t press “save changes” direct deposit will stay on.
Step 3 - Process the Pay Run
There’s a couple things here to pay attention to before you hit that Next button.
You’ll want to hit that “off-cycle pay” toggle and switch it to “Yes”
You’ll notice that when you switch it to “Yes,” the “Last day of pay cycle” date will automatically change. This is because you cannot have two pay cycles ending on the same end date. Wagepoint is trying to avoid messing up the regular scheduled payroll (thanks Wagepoint!).
Set the payment date
If you’re running an off-cycle pay with direct deposit, make sure you are choosing the correct payment date.
If you’re running the manual pay option, choose a payment date that works for the remittances to be debited from your company account.
Hit “Next” and prepare for WARNING!
If all your dates are fine and dandy, and you’ve toggled “off-cycle,” go ahead and hit that Next button.
If you are running a manual pay you should immediately be seeing this super handy warning from Wagepoint:

This is great for letting you know you’re on manual pay.
If you’re not seeing this, you know that you haven’t saved your toggle on the direct deposit setting and you have to go back to the beginning of step 2. : (
You’ll want to hit proceed anyway, because you’re a reckless soul and live on the wild side of trusting yourself to send e-transfers to your staff!
Disclaimer: You will still see Green “Pay” buttons for your staff - this is fine and does not mean they will be paid by direct deposit, just that you are indeed paying them on this payroll.
Other Disclaimer: If this payroll is just for one staff, like a final pay - make sure you toggle the other staff’s pay to “No.”
You will also see direct deposit check marks when you are reviewing your payroll like so:
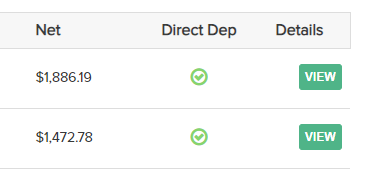
This checkmark only means that they have direct deposit set up within Wagepoint - it does not mean they will be paid via that method. (I promise!)
As long as you saw that Manual pay warning, and hit Proceed Anyways, direct deposit is definitely turned off.
Step 4 - Add Payment Amounts
You’ll now want to review what you are paying your staff. If you have additional incomes, these will still show up under an off-cycle pay.
You can toggle your income options to what suits your needs. (If you don’t see what you want in there, you can create an income type under Company - Income Types)
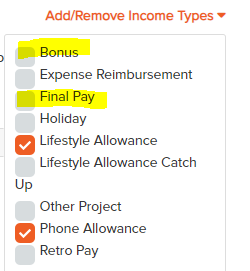
In this instance, if you wanted to remove the allowances usually paid out, you can click them off, and you can also add in income types like “Final Pay” or “Bonus” so it clearly shows on your reports that this payroll is not regular wages.
Once you have the correct income designated and the correct staff being paid you can go ahead and hit next until you arrive at the page where Wagepoint asks you to review and confirm your payroll.
Step 5 - Review and Confirm Payroll
This is my favorite page because it’s where I’ll find my mistakes, and where I’ll grab the correct amounts for manual pay.
I like to do a quick visual review of the staff being paid and their gross amounts to make sure it’s aligned with what I want. I then click into the “View All” button that will pull up the payroll details report.
Things to look for in this report!
- Dates - make sure your dates are as you selected.
- Income - you should see only the income types you’ve selected for payment (if you do happen to see allowances that shouldn’t be applied, you can go back and type in 0.00 in those allowance categories)
- Deductions - with an off-cycle pay, any custom deductions you have set up for your staff (i.e health benefits) will not be applied. Source deductions will still be deducted and remitted for you.
And then you’ll absolutely definitely want to check the totals at the bottom of this report:

You can see here that Direct Deposit is at 0 (see I told you those green check marks didn’t mean they were getting paid that way!)
The total amount Wagepoint will withdraw from your company account is equal only to the taxes they remit for you, and WagePoint’s fees. If you’re satisfied, you can save the report, or simply exit back to the review page.
You can grab the net amounts from your employee’s off of the payroll report - but the main review page makes the net amounts easier to see.

Step 6 - Determine Amount to Pay Employee(s)
You really want to make sure that you’re paying the Net amount for your e-transfer, as this is the amount that would have been directly deposited into their accounts had we kept that option on.
You can take a screenshot of that page, or write it down, or get the net amounts from the payroll report you saved, but either way, you’ll want to make sure you’ve got all the net amounts for your staff.
Alright! Everything looks good, you know what amounts to e-transfer your staff, you can hit that button that says you’ve reviewed things and Wagepoint is good to run your off-cycle payroll.
Step 7 - Pay your Employee(s)!
You’ve gotten the little robot that gives you a thumbs up for successfully running your payroll!

You’re going to manually pay (e-transfer, cheque, etc.) your staff their net amounts on the appropriate day. (Maybe you set yourself a reminder, or maybe you send it out early so you don’t forget - the important thing is to make sure they aren’t wondering where their money is!)
(Sidenote - if you forgot to record the net amounts for the staff, you can always head back to your payroll page and Wagepoint will have the reports for you to pull those numbers from)
You’re ready to be done with this whole thing and get back to not having to think too much about this, but!
You need to keep in mind that an off-cycle, or manual pay will mean you need to be mindful that your next regular pay has the correct dates.
Next time you run payroll
- Check that the end-cycle day and the pay dates are correct
- Ensure that off-cycle is no longer toggled to on
- Check that your correct income categories are displaying again
- Make sure that you have your direct deposit turned back on as well.
Vigilance with payroll is always recommended, but be extra mindful anytime you have deviated from the norm.
Remember - an out-of-the-norm payroll doesn’t mean it’s just one payroll to be extra mindful of, it’s the one that follows it as well.
CHEERS
Mic drop. Desk flip. I’M OUT.